-
Install Linksys Wireless PCI Adapter(WMP54G) Driver for Windows 7 64Bit
Posted on August 21st, 2011 Add commentsSeems like linksys doesn’t provide wireless PCI adapter driver for new Windows OS. The only way to install driver for Windows 7 is force to install the driver from the chip company.
- Download the driver from Here
- Unzip to somewhere. Let’s say “C:\”
- Go to “Control Panel” -> “Device Manager”, look for this adapter. Normally it will be shown like “Unknown Network Controller” or something like that
- Click this device, select “Update Driver Software”
- Select “Browse My Computer for driver software”
- Select “Let me pick from a list of device drivers on my computer”
- Scroll down to “Network Adapters” and double click. Then click “Have Disk”
- In the box that pops up, navigate to “C:\driver_folder”, and select the driver file
- Scroll down to “Ralink Technology Corp” in the box on the left side. On the right side, select “802.11b/g Wireless Adapter.” (Here I have tried select “Linksys” on the left, and “Linksys Wireless Adapter” on the right. It also works! Just choose whatever you want)
- Click YES on the warning window (if you see it)
- Done! (Sometimes the device still might not be working, try to right click the device and uninstall the driver, but DO NOT check “Delete the driver software for this device”, and restart the computer. Then Windows will help you install the driver again)
1,028 views -
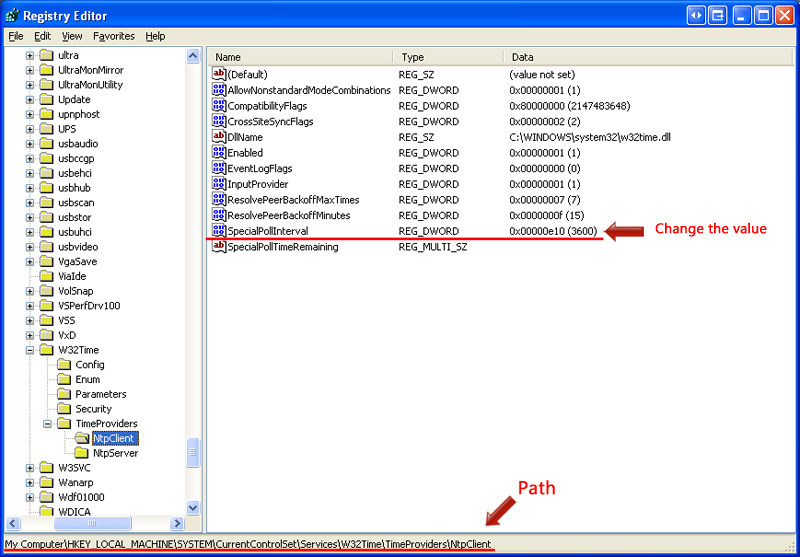
How to Change the Frequency of Windows Internet Time Synchronisation
Posted on September 28th, 2010 2 comments
636 views -
Install Self-signed SSL with IIS 6.0
Posted on September 23rd, 2010 Add commentsThe IIS 6.0 resource kit is provided by Microsoft for installing a self-signed testing certificate into IIS. To install it, do follow:
- Download IIS 6.0 resource kit tools from Here
- Install the resource kit, but only for Windows Server 2003 or Windows XP
- Go to Start Menu -> All Progrem -> IIS resource -> SelfSSL, click “SelfSSL”
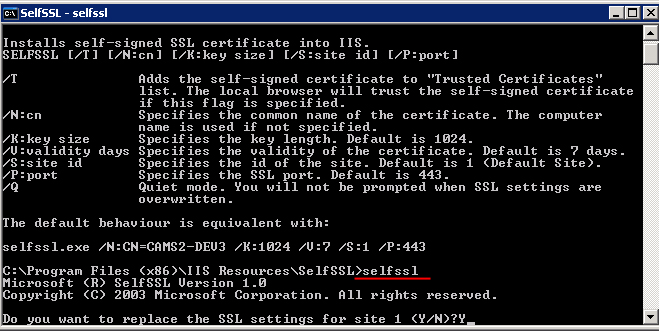
- In the pop-up command prompt, type “selfssl” to run the program
- Type “Y” to apply the setting to the website in IIS
- Test your website by using URL “https://user_website”
706 views -
Fixing “Unable to get the project file from the Web Server”
Posted on August 24th, 2010 5 commentsWhen trying to open an existing project in Visual Studio 2003, if keep getting a pop up message “Unable to get the project file from the Web Server”:

Try following to fix the problem:
- Check the webinfo file, make sure the “URLPath” is correct.
- Recreate the virtual directory for it and restart IIS.
- Delete the project cache in “C:Documents and SettingsusernameVSWebCache”
991 views -
Multiple websites in IIS on Windows XP Pro
Posted on August 17th, 2010 Add commentsUnlike Windows Server Edition, XP pro does not support multiple websites in IIS. However, we still can use several ways around this.
First option, just use IIS Admin, a simple program developed by a third-party developer for this purpose. (Download From Here)
The second option is to use adsutil.vbs, located in the folder “C:\Inetpub\AdminScripts”:12345C:\Inetpub\AdminScripts> adsutil.vbs ENUM /P W3SVC#(Find out what the highest numbered site you currently have is)C:\Inetpub\AdminScripts> adsutil.vbs create_vserv W3SVC/x#(Create a new website, Add one to the highest numbered site)Where x is replaced by the new numbered site. For example if you run the first command and the highest numbered site is 4, then replace x to 5.
12C:\Inetpub\AdminScripts> adsutil.vbs copy W3SVC/1 W3SVC/x#(Copy website 1 to website x)The third option is to use Metabase Explorer from the IIS 6.0 Resource Kit Tools.Copy the default website (/LM/W3SVC/1/) and then paste it. This will also give you another website, ready to use. (Download From Here)
Also we can delete the website using adsutil.vbs, Metabase Explorer or ADSI/WMI. To delete a website using adsutil.vbs, write this in a command prompt:1C:\Inetpub\AdminScripts> adsutil.vbs delete W3SVC/x
610 views


Recent Comments